Advertisement

We need your help now

Support from readers like you keeps The Journal open.

You are visiting us because we have something you value. Independent, unbiased news that tells the truth. Advertising revenue goes some way to support our mission, but this year it has not been enough.

If you've seen value in our reporting, please contribute what you can, so we can continue to produce accurate and meaningful journalism. For everyone who needs it.
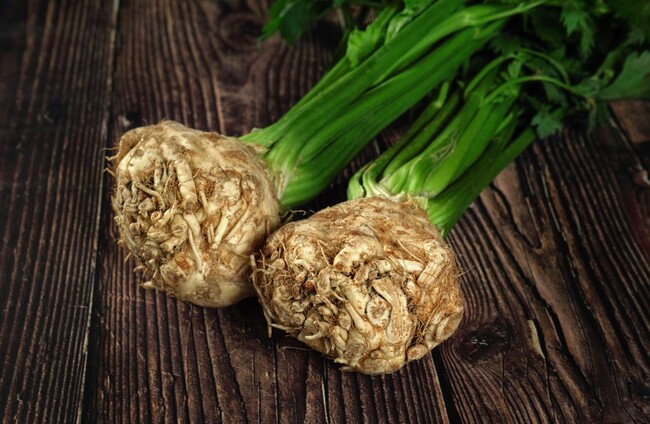
Did you know celeriac ribbons can be used in place of pasta? Shutterstock/Lubo Ivanko

From the Garden Using celeriac in more than just mashed potatoes

As Winter begins, there’s no better time to pickle some chilis or cook with more root vegetables, writes Michael Kelly.

THINGS FEEL LIKE they are winding down a little in the veg garden now to the extent that last weekend I felt, for the first time since January, that I really had no pressing tasks to do in the veg patch and could probably do something else instead.

That’s an odd feeling. The veg garden is a hard task master for much of the year, but it’s becoming a little more chilled out now as we move into November.

Unusually for me, I feel like I am well ahead in terms of getting the veg patch ready for next year.

In the big polytunnel, there are still a small number of tomato plants left, but only a few. I’ve been steadily removing them (and chopping them up for the compost heap) for the last month, so there are only about 10 plants left now still carrying a few tomatoes.

A few Sungold and the strange black fruiting Indigo Rose are all that remains. I got mixed up with the latter this year when I bought them, assuming they were a standard enough mid-sized red tomato, but actually they are a mid-sized black tomato.

Oddly, as soon as the fruits form on the vine they are jet black in colour and look ripe, but actually they are slow to ripen. They are only ripe when the underside of the tomato turns from milky green to red.

This can make harvesting them a little slow, because you have to check the bottom side before you pick. Though the flavour is a bit meh in my view, Indigo Rose tomatoes are exceptionally high in the anti-oxidant anthocyanin and they seem to be lasting a lot longer than the other varieties.

During the summer, I was bringing large crates of tomatoes into the house to be processed, but this week it was just a colander. How sad.

The Sungold tomatoes went into a bowl in the fridge for eating fresh (I refrigerate tomatoes at this time of the year to keep them a few days longer than they would at room temperature), while the rest got made in to a passata which can be used as the base sauce for a veg stew or soup later this week.

Back out in the tunnel, I was a little worried that it was too late for the green manure I sowed a few weeks back to establish, but it’s flying. I sowed some outside too in the courgette bed on the same day but that has only just germinated and with colder temperatures arriving I don’t know that it will amount to much.

I am delighted with it in the tunnel though and the carpet of green in the beds looks fantastic.

The fruit on the chili pepper plants, which I hung upside down in the tunnel so I could clear the beds, were starting to soften so I stripped them and brought them to the kitchen to pickle.

The Basics – Pickling Chilis

Pickled chilis are my new favourite thing and they are a brilliant way to store up chili peppers which can be super abundant at this time of the year.

They are really easy to make as well. Just slice the chilis into small rounds and stuff them into sterilized jars (jam jars or kilner jars).

In a saucepan heat equal parts vinegar and water (the amount depends on how many chilis you have to pickle, but let’s say 200ml of each); a teaspoon of salt, a tablespoon of sugar, a bay leaf, a teaspoon each of coriander and mustard seed.

When it comes to the boil, pour it over the chilis in the jar (making sure they are covered with the liquid) and then pop on the lid to seal the jars. They will keep for three to four months.

IMG_1931 Pickled chilis are a great way to use up large amounts of chili peppers. Michael Kelly Michael Kelly

Recipe of the Week – Celeriac ribbons with chard, garlic and pumpkin seeds

We’re saying goodbye to the last of the tomatoes, courgettes and other summer crops and moving on to warming, root veg like celeriac. I always grow about 30-40 of this wonder-veg and they sit happily in the ground until needed in the kitchen.

Celeriac is a veg that deserves better than just cooking it up with your mashed potatoes. It’s a brilliant veg to eat raw, for example, and in this intriguing recipe from Rosie Birkett we cut it in to long strips to use it like a pasta.

I really like that this recipe uses the stalks from the chard which are a part that is often discarded and shouldn’t be.

Ingredients

  • 1 small celeriac, peeled
  • 1 lemon, juiced
  • 40g pumpkin seeds
  • 2 tbsp extra virgin olive oil
  • 15g butter
  • 4 thyme sprigs, leaves removed
  • 2 finely chopped cloves of garlic
  • ½ tsp of dried chilli flakes
  • 1 bunch of chard – leaves separated from the stalks, stalks sliced and leaves shredded
  • 20g pecorino cheese

Directions

Using a vegetable peeler, cut long, wide strips (around an inch in width) around the circumference of the celeriac.

Place the strips into a bowl of water and lemon juice, until you have lots of ribbons. Allow for more than you would if using pasta.

Dry fry the pumpkin seeds in a pan until they’ve puffed and popped. Set aside.

Bring a large pan of salted water to the boil.

Add the celeriac for one minute, drain and reserve the water.

In a non-stick frying pan, heat the oil and butter until the butter has melted and foamed up.

Add the thyme, garlic and chili.

Cook the garlic mixture for five minutes until fragrant and almost golden, add the chard stalks and stir cooking for a couple more minutes.

Add the pumpkin seeds and the chard leaves, season and squeeze in some lemon juice.

Turn up the heat and stir in half the grated cheese.

Add the celeriac and some of the cooking water and toss, shaking the pan until the sauce looks glossy.

Divide between plates, top with more cheese and serve.

Michael Kelly is an author, broadcaster and founder of GIY.

image

Readers like you are keeping these stories free for everyone...
A mix of advertising and supporting contributions helps keep paywalls away from valuable information like this article. Over 5,000 readers like you have already stepped up and support us with a monthly payment or a once-off donation.

Author
Michael Kelly
View 3 comments
Close
3 Comments
This is YOUR comments community. Stay civil, stay constructive, stay on topic. Please familiarise yourself with our comments policy here before taking part.
Leave a Comment
    Submit a report
    Please help us understand how this comment violates our community guidelines.
    Thank you for the feedback
    Your feedback has been sent to our team for review.

    Leave a commentcancel

     
    JournalTv
    News in 60 seconds