Advertisement

We need your help now

Support from readers like you keeps The Journal open.

You are visiting us because we have something you value. Independent, unbiased news that tells the truth. Advertising revenue goes some way to support our mission, but this year it has not been enough.

If you've seen value in our reporting, please contribute what you can, so we can continue to produce accurate and meaningful journalism. For everyone who needs it.

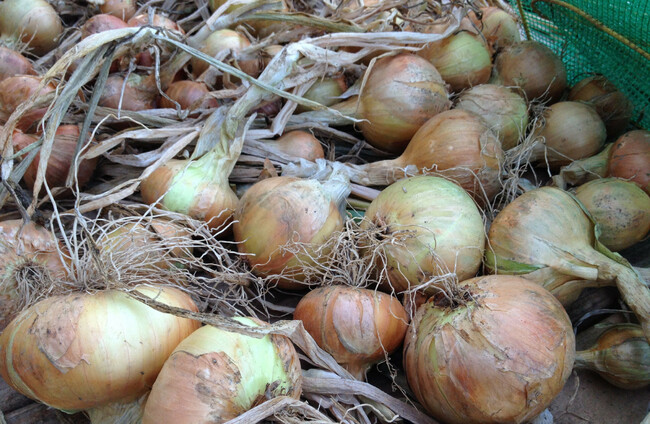
Onions drying Michael Kelly founder GIY

As winter approaches now is the time to think about growing your own onions

With temperatures dropping Michael Kelly has some tips to help you beef up your winter warmers.

BELATEDLY, TODAY I got around to sorting through the onion crop which has been ‘drying’ in the potting shed for oh I don’t know, 2 months.  

When I say ‘drying’ I really mean that they were just left there because I was just too lazy and forgetful to do anything with them. I was finally spurred to action when I noticed that some of the ones that I brought in to the kitchen this week were starting to rot.

Yikes.  Going to the trouble of growing about 100 onions and then leaving them to rot on a shelf in the potting shed is not, repeat not, a good plan.

So, onions do in fact need to be dried out in the sun after harvesting and before storage but 2-3 weeks is typically enough time.  I generally leave mine outside on a rack in the wind and sun to dry out, so that you get all the moisture out of the necks and stems before hanging them up. 

A properly stored onion braid should keep for 6 months or so. By hanging them in a braid, it allows air to flow around them. I’ve found that the braid needs to be stored inside the house – it seems to rot quicker if left in the shed.

This year however, when I brought them in from the rack in the garden, instead of braiding them, I left them on the shelf in the potting shed. 

They continued to dry there while the going was good with the weather but I think the temperatures were too variable in the potting shed as the autumn progressed – roasting hot by day, and cold at night.  

It’s worth bearing in mind that temperatures got down to grass frost territory at night-time earlier this week.

These extremes of temperature clearly don’t suit the onions and throwing them on a shelf on top of each other like I did does not make for optimal storage conditions.

Anyway, finally this morning before work I decided to get them inside the house before any more of them started rotting.  Thankfully only about 10 were damaged, and the rest were in good condition.

As I sorted through them, I removed the outer, dried skins to reveal a nice clean onion.

For now they are sitting in a crate in the kitchen, but (I promise) this weekend I will get around to braiding them finally.

GIY onions

Katie Sanderson will be appearing as chef in series 2 of Grow Cook Eat which will be airing next spring.  

During the filming of the onion episode we were chatting about how important she thinks it is to grow your own onions.  Her view is that since they form the basis of most meals, if you start with a quality home-grown onion, you elevate all your cooking.  This is an excellent point I think.

The Basics – Leaf Mould

Leaf mould is a wonderful mulch or soil conditioner and can be made completely free of charge using a raw material that is abundant at this time of the year – leaves. 

The only downside is that it takes a rather long time to make – 12-18 months. In general only use damp leaves – dry leaves won’t rot down.

Give them a good drenching with a hose if they are dry.

Here are two ways to make leaf mould:

  1. Choose a cool, damp spot in your garden.  Put four posts in the ground and fix chicken wire around the outside to make a wire frame.  Simply tip the leaves in until it’s full and then let them rot down.
  2. If you are space constrained, make your leaf mould in black plastic dustbin sacks.  Puncture the sacks to let air in. Store them somewhere cool.

 Recipe of the Week – Piccalilli 

Here is another wonderful “gluttony” recipe that will help you to preserve four vegetables that don’t store very well – cauliflower, runner beans, cucumber and courgettes.  

It makes a wonderful, spicy, vibrant-coloured piccalilli that makes a great accompaniment for cold meats or cheeses.

Ingredients:

  •  450g/1 lb salt
  • 4.5 litres/8 pints boiling water
  • 2 medium cauliflowers (each weighing about 450g/1 lb), broken into small florets
  • 450g/1 lb pickling onions, peeled and halved
  • 450g/1 lb runner beans, topped and tailed, sides peeled away and cut diagonally into 2.5cm(1 inch) pieces
  • ½ large cucumber, halved lengthways, seeds removed and then into 1cm(0.5in) chunks
  • 225g/8oz courgettes, topped and tailed and cut into 1cm chunks
  • 275g/10oz caster sugar
  • 1.5 litres/2 pints 13fl oz distilled malt vinegar, plus extra 5 tbsp
  • 2 cloves garlic, crushed
  • ½ whole nutmeg, grated
  • ½ tsp ground allspice
  • 50g/1¾oz plain flour
  • 25g/1oz mustard powder
  • 25g/1oz turmeric powder
  • 15g/½oz ground ginger
  • ½ tsp cayenne pepper

Directions:

Mix the salt with the boiling water. Leave to cool, divide between two large bowls and add the cauliflower and onions to one bowl and the runner beans, cucumber and courgettes to the other.

Cover with a plate to keep the vegetables submerged and leave for 12-24 hours. Drain the vegetables and rinse them well, still keeping them separate.

Put the sugar, garlic and 1.5 litres (2 pints 13fl oz) of vinegar into a large pan.

Bring to the boil, add the cauliflower, onions, allspice and nutmeg and cook for just three minutes.

Add the beans and the cucumber and cook for a further 4-5 minutes.

The vegetables only want to be just cooked, with still a little crunch left in them.

Lift out of the vinegar with a large spider or sieve into a large bowl and set aside.

Mix the flour, mustard, turmeric and ginger powder with the rest of the vinegar and enough water to make a smooth paste.

Add a little of the hot vinegar mixture, stir into the rest left in the pan and bring to the boil, stirring.

Simmer for 10 minutes.

Stir the sauce into the vegetables, spoon into warm sterilised jars and seal with vinegar proof lids.

Michael Kelly is founder of GIY and GROW HQ. 

Click here for more GIY tips and recipes.

Readers like you are keeping these stories free for everyone...
A mix of advertising and supporting contributions helps keep paywalls away from valuable information like this article. Over 5,000 readers like you have already stepped up and support us with a monthly payment or a once-off donation.

View 14 comments
Close
14 Comments
This is YOUR comments community. Stay civil, stay constructive, stay on topic. Please familiarise yourself with our comments policy here before taking part.
Leave a Comment
    Submit a report
    Please help us understand how this comment violates our community guidelines.
    Thank you for the feedback
    Your feedback has been sent to our team for review.

    Leave a commentcancel

     
    JournalTv
    News in 60 seconds